

Welcome to the James Hardie Installation Guide, your comprehensive resource for successfully installing fiber cement siding, trim, and panels․ This guide provides step-by-step instructions, safety tips, and best practices to ensure a professional-grade installation․ Whether you’re a seasoned contractor or a DIY enthusiast, this guide will help you achieve a durable, long-lasting, and visually stunning exterior transformation for your home․
Overview of James Hardie Products
James Hardie offers a wide range of high-performance fiber cement products designed for exterior and interior use․ Their portfolio includes lap siding, shingle siding, architectural panels, and trim, all known for durability and aesthetic appeal․ These products are engineered to withstand harsh weather conditions, resist pests, and require minimal maintenance․ With a variety of textures, colors, and styles, James Hardie products cater to diverse architectural designs, from modern to traditional․ Their fiber cement solutions are fire-resistant, eco-friendly, and built to last, making them a preferred choice for homeowners and contractors seeking long-lasting, beautiful exteriors․
Importance of Proper Installation
Proper installation of James Hardie products is crucial to ensure durability, weather resistance, and aesthetic appeal․ Improper techniques can lead to premature wear, water damage, or structural issues․ Following the installation guide helps maintain the product’s warranty and performance․ Correct fastening, flashing, and sealing are essential to prevent gaps and leaks․ Proper installation also enhances fire resistance and pest protection, key benefits of fiber cement siding․ By adhering to guidelines, you ensure a long-lasting, low-maintenance exterior․ Always consult the guide for specific instructions tailored to your product and climate conditions to achieve optimal results․
What to Expect in This Guide

This comprehensive guide provides detailed instructions for installing James Hardie fiber cement products, ensuring a successful and professional-grade result․ It covers preparation, tools, and materials needed, along with step-by-step installation processes for lap siding, shingles, and architectural panels․ You’ll also find sections on proper fastening techniques, flashing, sealing, and finishing touches like trim and painting․ The guide emphasizes safety measures and best practices to maximize product durability and achieve a polished, weather-resistant exterior․ Whether you’re a contractor or homeowner, this guide offers everything needed to complete your project confidently and effectively․

Pre-Installation Preparation
Ensure a smooth installation by gathering essential tools, preparing the site, and implementing safety measures․ Properly handle and store James Hardie products to guarantee a successful project outcome․
Tools and Materials Needed
Begin by gathering essential tools and materials․ You’ll need a utility knife, drill, screwdrivers, circular saw, measuring tape, level, pry bar, and caulk gun; Ensure you have a weather-resistant barrier, appropriate fasteners, flashing materials, and exterior-grade caulk․ Use high-quality sealants to meet James Hardie’s durability standards․ Always use gloves and safety goggles when handling materials․ Verify all tools are in good working condition to ensure precise cuts and secure fastening․ Proper preparation ensures a smooth and efficient installation process, adhering to manufacturer guidelines for optimal results․
Site Preparation and Safety Measures
Before starting, ensure the site is clear of debris and obstructions․ Check weather conditions to avoid rain or extreme heat․ Cover surrounding surfaces with drop cloths to protect them from damage․ Set up scaffolding securely, ensuring stability on firm ground․ Wear personal protective equipment, including gloves, safety glasses, and a dust mask․ Inspect the structure for any existing damage or rot that needs addressing․ Ensure electrical and plumbing elements are safely accessible․ Use proper lifting techniques to avoid injury․ Keep a first aid kit on-site and ensure all team members are aware of emergency procedures․ Organize materials neatly to prevent tripping hazards․ Review safety guidelines with your team before commencing work․
Handling and Storing James Hardie Products
Proper handling and storage of James Hardie products are essential to maintain their quality and prevent damage․ Always lift products carefully, avoiding bending or flexing, and use dollies or forklifts for heavy materials․ Store products on flat, dry surfaces, away from direct sunlight and moisture․ Keep them protected from wind and weather by covering with breathable materials․ Ensure siding and panels are stacked neatly, no more than 12 feet high, to prevent warping․ Avoid stacking different product types together to minimize damage․ Store in a well-ventilated area to prevent moisture buildup․ Inspect products before installation for any visible damage․ Follow these guidelines to ensure your James Hardie products remain in optimal condition․

Surface Preparation
Ensure surfaces are clean, dry, and free from debris or old materials․ Check for damage or uneven areas and repair them before installation for a smooth finish․
Preparing Wood Surfaces
Properly preparing wood surfaces is crucial for a successful installation․ Ensure the surface is clean, dry, and free from dirt, mold, or mildew․ Inspect for any damaged or rotten wood and replace it before proceeding․ Sand rough areas to create a smooth base and fill any gaps or cracks with a suitable wood filler․ Allow the filler to dry completely before sanding it down to a even finish․ Wipe away dust and debris with a clean cloth or brush․ If necessary, prime the wood surface according to the manufacturer’s recommendations to ensure optimal adhesion of James Hardie products․ Proper preparation ensures a secure and long-lasting installation․
Preparing Vinyl and Brick Surfaces
For vinyl surfaces, clean thoroughly with a mild detergent to remove dirt and grease․ Rinse well and allow to dry completely․ Inspect for cracks or damage and repair as needed․ Ensure the surface is flat and secure․ For brick surfaces, brush away dirt, mortar, or loose material․ Fill any gaps or cracks in the mortar joints with a suitable sealant․ Allow the sealant to cure fully before proceeding․ Wipe down the surface to remove dust․ Ensure the brick is dry and free of efflorescence․ Avoid using silicone-based products, as they may interfere with adhesion․ Proper preparation ensures a durable and weather-tight installation․
Ensuring a Clean and Dry Surface
A clean and dry surface is essential for proper installation of James Hardie products․ Remove dirt, grime, and old adhesives using a mild detergent and water․ Avoid harsh chemicals or abrasive cleaners that may damage the substrate․ Rinse thoroughly and allow the surface to dry completely․ Inspect for moisture or condensation, especially in shaded or exposed areas․ Use a moisture meter to confirm the surface is dry․ Address any issues like water damage or rot before proceeding․ A clean, dry surface ensures optimal adhesion and prevents future warping or mold growth․ Proper preparation is key to a successful installation․
Installation Process
The installation process involves carefully following James Hardie’s guidelines for lap siding, shingle siding, and architectural panels․ Ensure compliance with manufacturer instructions, proper tool usage, and safety protocols to achieve professional results․
Installing Lap Siding
Installing James Hardie lap siding requires precision to ensure a seamless and durable exterior finish․ Begin by preparing the surface, ensuring it is clean, dry, and even․ Use a circular saw or utility knife to cut siding pieces, and always wear safety goggles․ Align the first piece with the bottom edge, securing it with approved fasteners 1 inch from the edges․ Maintain a 1/4-inch gap between planks for expansion․ Fasten each subsequent piece, overlapping the previous one by 1 inch․ Ensure proper spacing and alignment to avoid warping․ Inspect each piece for damage before installation and follow manufacturer guidelines for a flawless finish․
Installing Shingle Siding
Installing James Hardie shingle siding involves careful handling of individual shingles to achieve a classic, timeless look․ Begin by aligning the first course at the bottom, ensuring it is level and securely fastened․ Use galvanized or stainless steel nails, spacing them 6-8 inches apart․ Each shingle should overlap the one below by 1-2 inches, depending on the product specifications․ Work upward, maintaining proper alignment and spacing to prevent gaps or misalignment․ Leave a 1/4-inch gap at joints for thermal expansion․ Inspect shingles for damage before installation and follow manufacturer guidelines for nailing patterns to ensure durability and weather resistance․
Installing Architectural Panels
Installing James Hardie architectural panels requires precision to achieve a sleek, modern appearance․ Begin by aligning panels with the structure’s framing, ensuring proper spacing and level placement․ Use approved fasteners, spacing them 12 inches apart for vertical installations and 6-8 inches for horizontal applications․ Leave 1/4-inch gaps at joints and edges to accommodate thermal expansion․ Secure panels firmly to studs, avoiding over-tightening․ Apply sealants to all gaps and joints post-installation for weatherproofing․ Follow manufacturer guidelines for specific panel types, such asHardie Architectural Panels, to maintain durability and aesthetic appeal․ Always ensure panels are properly aligned and fastened to prevent warping or damage․

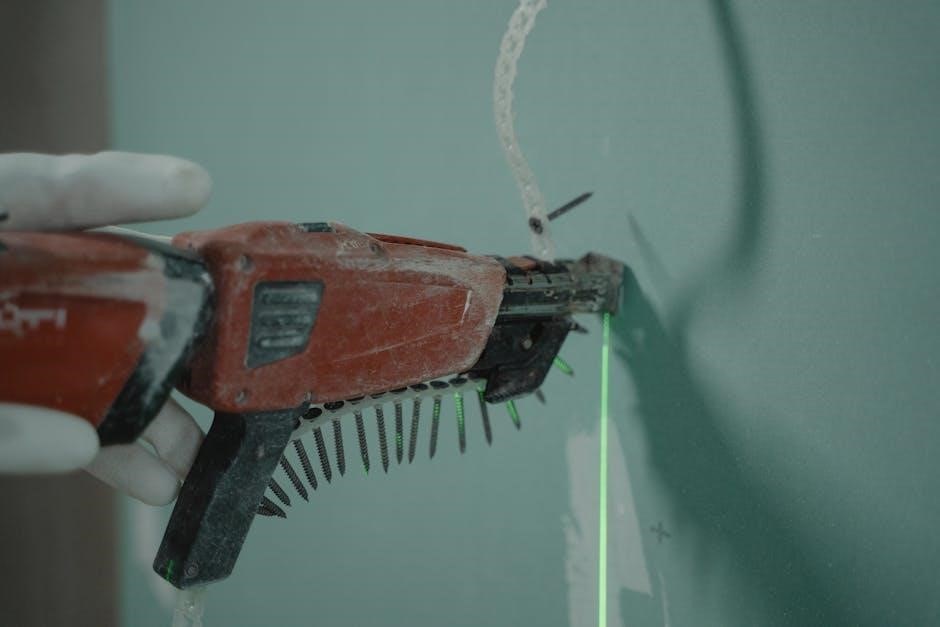
Fastening Techniques
Proper fastening techniques secure James Hardie siding, ensuring durability and weather resistance․ Use approved fasteners, maintain correct spacing, and avoid overtightening to prevent damage properly․
Choosing the Right Fasteners
Choosing the right fasteners is crucial for a secure and durable James Hardie siding installation․ Use galvanized or stainless steel fasteners to prevent rust and ensure long-lasting performance․ Fasteners must be compatible with fiber cement materials and meet local building codes․ For lap siding, opt for siding nails or screws with a minimum 1-1/2″ length․ For shingles and panels, use ring-shank nails to enhance holding power․ Always consult James Hardie’s approved fastener list to avoid improper selections, which can lead to premature loosening or damage․ Proper fasteners ensure a weather-tight seal and maintain the integrity of your siding system․
Fastening Patterns and Spacing
Proper fastening patterns and spacing are essential for ensuring the structural integrity and visual appeal of your James Hardie siding installation․ For lap siding, fasteners should be spaced 12-16 inches apart vertically and 6-8 inches apart horizontally․ Use one fastener per plank at each stud location, ensuring they are centered and not over-tightened․ For shingles and architectural panels, follow a staggered pattern with fasteners spaced 6-8 inches apart․ Always maintain a 1/8-inch gap between siding elements to allow for expansion and contraction․ Refer to James Hardie’s guidelines for specific spacing requirements to ensure a secure and weather-tight installation․
Avoiding Common Fastening Mistakes
To ensure a durable and secure installation, avoid common fastening mistakes; Over-tightening can damage siding, while under-tightening may lead to loose panels over time․ Never align fasteners directly above each other, as this can create weak points․ Always use the recommended fasteners and spacing to prevent warping or buckling․ Avoid placing fasteners too close to edges or corners, as this can compromise structural integrity․ Proper alignment with studs is crucial to avoid uneven surfaces․ Finally, never over-drive fasteners, as this can strip the material․ By following these guidelines, you can achieve a professional-grade installation that lasts for years․

Flashing and Sealing
Flashing and sealing are critical for preventing water infiltration and ensuring long-term durability․ Use high-quality materials and follow manufacturer guidelines to achieve optimal weatherproofing and structural integrity․
Proper Flashing Techniques
Proper flashing techniques are essential to prevent water damage and ensure the longevity of your James Hardie siding; Always install flashing around windows, doors, roof lines, and any other areas where water may penetrate․ Use high-quality, weatherproof materials that are compatible with fiber cement products․ Ensure flashing is tightly sealed and aligned with local building codes․ Properly secured flashing prevents moisture infiltration, protecting both the siding and the structural integrity of your home․ Follow manufacturer guidelines for installation to achieve a watertight seal and maintain your warranty coverage․
Sealing Gaps and Joints
Sealing gaps and joints is critical to ensure weatherproofing and prevent water infiltration․ Inspect all areas where siding meets windows, doors, or other materials, and apply a high-quality, exterior-grade sealant․ Use a caulking gun to fill gaps evenly, ensuring a watertight seal․ Avoid overfilling, as this can lead to uneven surfaces․ Wipe away excess sealant immediately with a damp cloth․ For James Hardie products, use sealants compatible with fiber cement to maintain durability and warranty․ Properly sealed gaps enhance energy efficiency and protect your home from moisture damage, ensuring long-lasting performance and curb appeal․
Ensuring Weatherproofing
Weatherproofing is essential to protect your home from water damage and maintain the integrity of James Hardie siding․ Proper flashing techniques around windows, doors, and rooflines are critical, as they redirect water away from vulnerable areas․ Use high-quality, weather-resistant materials compatible with fiber cement products to ensure long-lasting protection․ Regularly inspect for gaps or cracks and address them promptly․ Properly sealed joints and flashing systems work together to create a weather-tight barrier, safeguarding your home from rain, snow, and humidity․ This step ensures your siding remains durable and maintains its aesthetic appeal for years to come․

Finishing Touches
Add the final details to enhance your home’s curb appeal with trim, molding, and paint․ These finishing touches complete the transformation, ensuring a polished and durable exterior․
Installing Trim and Molding
Installing trim and molding is the final step in achieving a seamless, professional-looking exterior․ Measure and cut trim pieces to fit corners, edges, and joints․ Secure them using compatible fasteners, ensuring alignment with siding․ For a polished look, miter corners precisely and seal gaps with weatherproof sealant․ Use fiber cement or PVC trim for durability․ Always follow manufacturer guidelines for materials and tools, such as mitre saws and sealants, to ensure a flawless finish․ Proper installation enhances both aesthetics and weatherproofing, completing your home’s transformation beautifully․
Painting and Finishing
For a polished look, ensure surfaces are clean, dry, and free of dust before painting․ Use 100% acrylic paint specifically designed for exterior use․ Apply thin, even coats, allowing proper drying time between layers․ Avoid painting in direct sunlight or during wet conditions․ Choose from a wide range of colors to match your home’s style․ Proper painting enhances durability and aesthetics, protecting your siding while maintaining its curb appeal․ Follow manufacturer guidelines for paint compatibility and application methods to ensure long-lasting results and a professional finish․
Final Inspection and Touch-ups
After completing the installation, conduct a thorough final inspection to ensure all siding, trim, and panels are properly aligned and secured․ Check for gaps, uneven surfaces, or loose fasteners, and address any issues promptly․ Touch-ups may include caulking small gaps, repainting scratched areas, or adjusting trim for a seamless finish; Use materials compatible with James Hardie products to maintain durability and weatherproofing․ A final walk-around ensures your project meets professional standards, providing a polished appearance and long-lasting performance․ This step is crucial for achieving a flawless and enduring exterior transformation․

Maintenance and Repair
Regularly inspect and clean your James Hardie siding to maintain its appearance and durability․ Address any damage promptly to prevent further issues and ensure long-lasting performance․ Maintenance and repair are essential for preserving the integrity and beauty of your exterior․
Regular Maintenance Tips
Regular maintenance is key to ensuring the longevity and appearance of your James Hardie siding․ Inspect your siding annually for cracks, gaps, or damage caused by weather or pests․ Clean the surface with a mild detergent and water to remove dirt and mildew․ Avoid using harsh chemicals or abrasive materials that could damage the finish․ Trim back vegetation to prevent moisture buildup․ Check and replace any worn-out sealants around windows and doors․ Regular touch-ups to painted areas will help maintain the siding’s integrity and aesthetic appeal․ Proper upkeep ensures your siding remains durable and weather-resistant for years to come․
Repairing Damaged Siding
Repairing damaged James Hardie siding is essential to maintain its durability and appearance․ Start by assessing the damage—cracks, holes, or warping․ For minor cracks, use a fiber cement patching compound, spreading it evenly with a putty knife․ Allow it to dry completely before sanding smooth․ For larger holes or broken boards, replace the damaged siding with new pieces, ensuring proper alignment and fastening․ Clean the area thoroughly before applying any repair materials․ After repairs, paint the siding to match the original color․ Regular inspections and timely fixes prevent further damage and extend the life of your siding․
Extending the Life of Your Siding
To extend the life of your James Hardie siding, regular maintenance is crucial․ Clean the siding annually with a mild detergent and water to remove dirt and mildew․ Inspect for cracks, gaps, or loose boards and repair them promptly․ Touch up any faded or chipped paint to maintain weather resistance․ Avoid using harsh chemicals or abrasive materials that could damage the fiber cement․ Trim nearby vegetation to prevent moisture buildup, and ensure proper ventilation to reduce humidity․ By following these steps, you can protect your siding from premature wear and ensure it remains durable and visually appealing for years to come․

Additional Resources
Explore James Hardie’s official website for detailed installation guides, warranty information, and design inspiration․ Utilize their online tutorials and contact their support team for professional assistance․
Manufacturer Support and Warranty
James Hardie offers exceptional manufacturer support, including comprehensive warranties for their fiber cement products․ Their 30- to 50-year limited product warranty provides peace of mind, ensuring durability and performance․ The warranty is transferable, adding value to your home․ Additionally, James Hardie provides dedicated customer service, online resources, and detailed installation guides to ensure successful projects; Their commitment to quality and customer satisfaction makes them a trusted choice for homeowners and contractors․ Rely on James Hardie for reliable support and long-lasting product protection․
Online Tutorials and Videos
Enhance your installation experience with James Hardie’s online tutorials and videos, designed to guide you through every step of the process․ From product demonstrations to detailed installation techniques, these resources provide valuable insights for both contractors and DIY enthusiasts․ The James Hardie Pros Hub offers a wealth of instructional content, including step-by-step guides and tips for achieving professional-grade results․ Additionally, their 3D Home Visualizer allows you to explore product options and see how they look on your home before installation․ These tools empower you to make informed decisions and ensure a successful project outcome․
Professional Installation Services
For a seamless and stress-free experience, consider James Hardie’s professional installation services․ Their network of certified contractors ensures your siding, trim, and panels are installed with precision and care․ These experts are trained to handle complex projects, guaranteeing a flawless finish that enhances your home’s curb appeal․ By choosing James Hardie’s authorized installers, you benefit from warranties, quality assurance, and a commitment to excellence․ Let the professionals handle the work while you enjoy the durability and beauty of your new fiber cement exterior;